How to use location codes
We regularly visit Picqer users to see how they use the software in practice. One thing we often notice is that it is difficult to start picking in a warehouse that does not have any location codes in place.
This article explains how to work with location codes and how to get started easily.
The benefits
Giving every location a clear and unique code offers many advantages, such as:
- New team members can start quickly. Just give them a pick list with location codes and they can begin fulfilling orders efficiently.
- Experienced pickers stay efficient, even during busy times.
- It becomes easier to add new products to your warehouse. Place them in an available location, enter the code into Picqer, and you are ready. Picking these products takes just as much time as familiar ones.
- You have more freedom in how you organise your warehouse. More on that below.
The key principles
Creating location codes is quite straightforward. The best approach depends on your warehouse layout. These are the main things to keep in mind:
- Make sure new team members can immediately understand the setup of your warehouse with minimal explanation and without needing to memorise anything.
- No product knowledge should be needed to find an item. Is the inflatable pool lion in section A because it is inflatable, or in section C with the pool accessories? That is not practical.
How to number locations
Now for the most important part: the numbering system. There are many ways to build your codes, but we will focus on the most logical method for a typical ecommerce warehouse.
This is how a location code is structured:
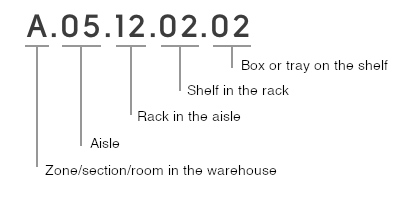
A good code should be clear both at a larger scale and up close. Larger scale so you know which direction to walk (zone and aisle), and up close so you can pick the right product without doubt.
Not every part is needed
The example above shows a full code structure, but not all parts are necessary. If you only have one zone, skip the zone letter. The same goes for shelves or bins. If you do not use them, simply leave that part out of the code.
If you use floor locations instead of racks, the same method applies without shelf and bin numbers. For example, B.07.02. Draw boxes on the floor and clearly label each location.
Extra tips
- Number aisles, not shelf rows. Use odd numbers on the right and even numbers on the left, just like house numbers. This already gives you a natural walking path when you sort the list in Excel.
- Use leading zeros to keep each part of the code the same length. For example, use 05 for aisle numbers if you have more than nine. Uniform codes are easier to read and process visually.
- Separate code sections with dots or spaces. Use 03.05 instead of 0305 to improve clarity.
- Whenever possible, store only one unique product per location to improve picking speed and reduce errors.
Examples

Example 1 shows a simple warehouse from above. Each grey block is a rack. Since this is one space, we do not use a zone letter. There are three aisles, with odd numbers on the right and even numbers on the left. The marked rack is 03.05.
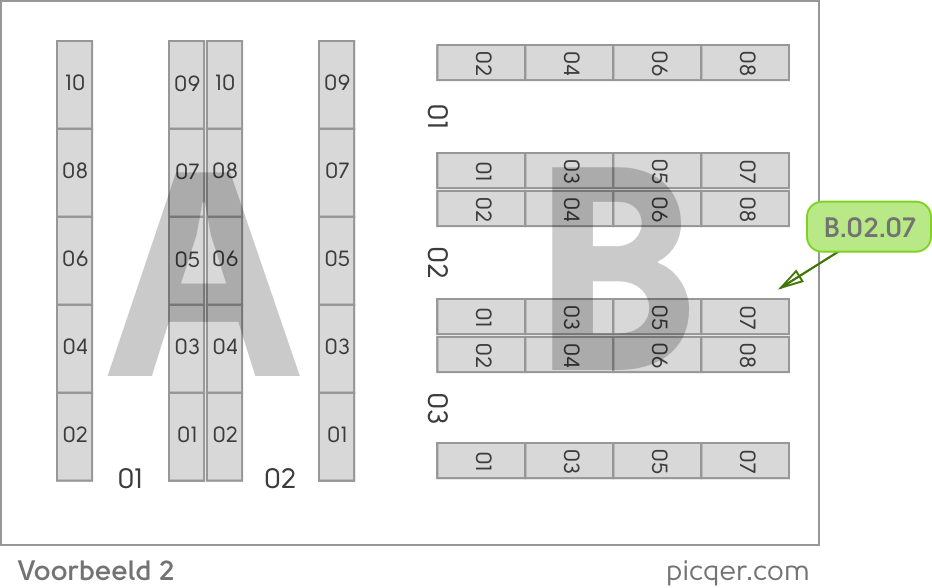
Example 2 also shows one large space but with different aisle layouts. In this case, treat each layout as a separate zone and assign a letter to each one. You can either number the aisles within each zone or continue numbering across zones. The marked rack is B.02.07.
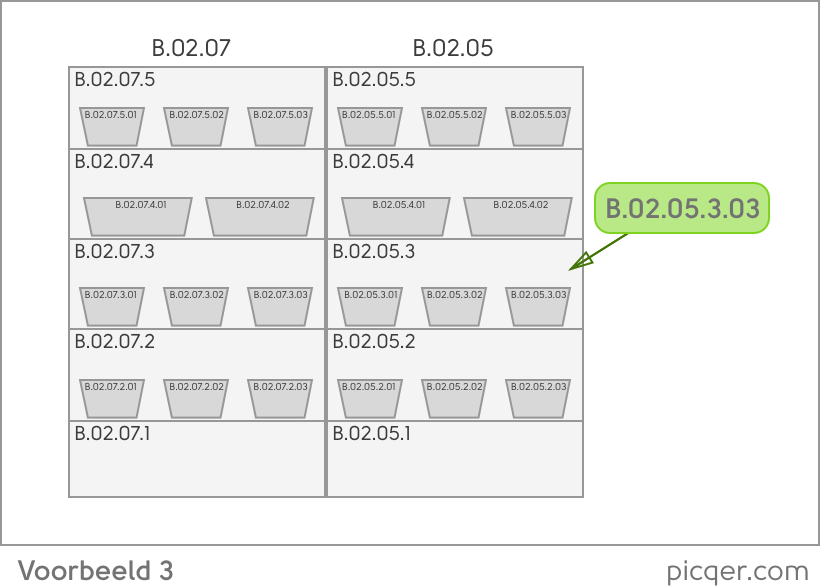
Example 3 shows a front view of two racks: B.02.05 and B.02.07. Shelves are numbered from bottom to top. Each shelf can have multiple bins. The highlighted bin is B.02.05.3.03, which means shelf 3, bin 03.
Signs and labels
Label each location clearly using signs or stickers, so pickers do not need to double check or guess. Make sure aisle numbers remain visible while walking through the aisles.
It is best to always show the full location code. For example, show A.05.12 instead of just 12. And for bins, show A.05.12.2.02 instead of 2.02. This helps confirm you are at the correct location quickly.
Start small
If you are not ready to label your entire warehouse, start with just the zones, aisles and racks. Link these to the correct products in Picqer or your shop system, and you are already off to a good start. In most warehouses, this can be done in a single day. It is better to start tomorrow with the basics than wait half a year for the perfect setup.
Flexible layout
Now that your products are stored by location, you can redesign your warehouse without affecting the picking process.
Improve your layout by:
- placing best-selling items close to packing stations
- keeping similar looking products, like different sizes of the same item, far apart
- placing heavy products at waist height
These improvements reduce mistakes and walking time in your warehouse, without any drawbacks, since you are picking based on location rather than recognising products by sight.


