

Printing product labels
Picqer prints product labels with a barcode, so you can scan products that don't have a barcode of their own. This page covers which printer and labels you need, what ends up on the label, and how to print them.
On this page
Setting up your printer
Suitable printers
We recommend using a different printer for product labels than for your shipping labels. If you share one printer, you have to swap the label roll every time and set the size again as well, both in Picqer and on the printer itself. We've successfully tested the following printers with Picqer for product labels:
- Dymo LabelWriter 550 (Turbo) and its predecessor, the Dymo LabelWriter 450 (Turbo)
- Dymo LabelWriter 5XL and its predecessor, the Dymo LabelWriter 4XL
- Zebra ZD421d and its predecessors, the Zebra ZD420d and GK420d
Label size
The minimum size for product labels is 50mm wide and 25mm high. Any smaller and the barcode and text won't both fit. The recommended minimum is 55mm wide and 28mm high, so everything displays properly.
On labels taller than 31mm, Picqer prints two lines of the product name instead of one, and wider labels fit more of that name. Beyond that, a bigger label gains you little: the barcode doesn't keep growing with it, because an oversized barcode is harder to scan up close.
You set the size in two places: in Picqer, so Picqer lays the label out at the right size, and on the printer itself, so the label comes out at that size too. If the two don't match, part of the label may end up outside the sticker.
In Picqer, go to Settings > Printers, click your label printer and set 'Paper format' to 'Custom format'. Then fill in your size in millimeters under 'Width' and 'Height'.
Where you set the size on the printer depends on your printer and your computer:
- Zebra on Windows: set the size in Zebra Setup Utilities. You'll find the steps under configuring a Zebra printer, where we use A6 shipping labels as the example. Enter the size of your product labels under 'Width' and 'Height'.
- Dymo, or Zebra on a Mac: open PrintNode, go to the 'Printers' tab and fill in 'Page Width' and 'Page Height' for your printer. Zebra Setup Utilities is Windows-only, so on a Mac you set the size in PrintNode.
Both PrintNode and Zebra Setup Utilities work in inches. Divide your millimeters by 25.4 to convert. For example: 89mm / 25.4 = 3.50 inches.
Printing on a Dymo and the content comes out rotated 90 degrees? Swap 'Page Width' and 'Page Height' in PrintNode.
Label content
Every product label shows the product name, a Code 128 barcode and that same code as readable text underneath:
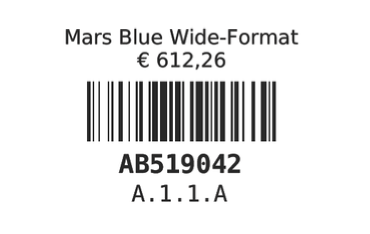
You choose which code goes in the barcode, and whether the price and location appear on the label, under Settings > General settings:
- Data to use in barcode on product labels: by default we use the product code for the barcode on the label. You can also choose to use the code from the barcode field. If a product has no barcode we still use the product code, and if it has more than one we use the first. Whichever code you pick here, Picqer also prints it as text below the barcode.
- Show price on product labels: shows the sales price including VAT on the label.
- Show location on product labels: shows the warehouse location at the bottom of the label. If the product sits in more than one location in that warehouse, all of them end up on the label, separated by commas.
Printing product labels
You can print product labels from three places in Picqer. Where you print from determines how many labels come out of the printer:
- Product page: click 'Print labels' in the top right corner. Under 'Amount' you enter how many labels you want, which is one by default.
- Purchase order: choose 'Print product labels' from the 'Actions' menu. You get as many labels per product as you ordered.
- Receipt: choose 'Print product labels' from the 'Actions' menu. You get as many labels per product as you received.
In the print window, pick the printer you want to use under 'Printer'. Picqer preselects the printer set as 'Printer for product and location labels' on your packing station. To set up your printers and packing stations, read the guide on printers and packing stations.
Printing from the product page with 'Show location on product labels' switched on? Then use 'Location from' to pick which warehouse's location ends up on the label. When you print from a purchase order or receipt, Picqer uses that purchase order's or receipt's warehouse automatically.