

Troubleshooting printer issues
Printing not working the way you expect? Find your problem below and work through the steps in order.
On this page
Automatic printing isn't working
Picqer sends a print job to PrintNode, and PrintNode forwards it to the printer at your packing station. If something goes wrong anywhere in that chain, nothing comes out of the printer. Work through the steps below until you find the cause.
Shipping labels
- Print a label through your browser. Go to 'Shipments', open any label with the 'Label' button and print it on your printer. If that works, the problem lies with PrintNode or its connection to Picqer: work through the steps below. If it doesn't work, the problem sits between your computer and the printer and has nothing to do with Picqer.
- Check that the user is connected to a packing station. You can see the connected packing station in Picqer, in the top right, under the user's name.
- Check that the right printer is connected to that packing station. You do this in the printer settings.
- Check that PrintNode is running and logged in. PrintNode needs to be running on the computer the printer is connected to, and you need to be logged in there with the email address linked to Picqer. That email address is at the bottom of the printer settings in Picqer. If you get a timeout when logging in, go to 'Network settings' on the login screen and change the HTTP library from 'Curl' to 'Requests'.
- Check the computer's internet connection. PrintNode re-downloads every label, so an unstable Wi-Fi connection can cause jobs to stall or fail. Connect the computer with a cable if you can.
- Update PrintNode. You'll find the latest version on the PrintNode website. There are two versions for Mac: if you're on a Mac with Apple Silicon, remove the Intel version and install the Apple Silicon version instead.
- Change the Engine in PrintNode. The Engine sends the print jobs to your printer. Go to the 'Printers' tab in PrintNode and select a different 'Engine'.
- Reconnect the printer. Remove the printer from Picqer and add it again. If that doesn't help, remove PrintNode from the computer completely and reinstall it by following Installing PrintNode.
- Check your antivirus and security software. Programs such as Datto EDR agent and Endpoint Protection Service block PrintNode. Turn them off temporarily or add PrintNode to the whitelist.
Picklists and packinglists
Picklists and packinglists go to a regular A4 printer and only print automatically when that's configured.
- Check the settings for automatic printing. The printer settings include a 'Settings for automatic printing' section. Under 'Picklists', you choose the printer a picklist is printed on as soon as it's created. Under 'Packinglists', you choose between 'Print on selected packing station' and 'Do not print automatically', which applies when a picklist is closed.
- Check that the rule ran. Rules override the settings above. If you print through a rule, the history of the order or the picklist shows whether that rule ran.
- Settings and rule both correct, but still nothing coming out of the printer? Then work through the steps under Shipping labels above. From here, the problem is the same for every document type.
The printer only works after a restart (Windows)
Does printing only work once you restart the computer? Then Windows isn't fully loading the printer driver and print queue on a cold start. Change these three settings. They only exist on Windows.
- Turn off Fast Startup. Open 'Control Panel' and go to 'Power Options'. In the left column, click 'Choose what the power buttons do'. At the top, click 'Change settings that are currently unavailable', otherwise you can't change the checkboxes at the bottom. Clear 'Turn on fast startup' and click 'Save changes'.
- Set the Print Spooler to delayed start. Press the Windows key + R, type services.msc and press Enter. Right-click 'Print Spooler' and choose 'Properties'. Change the startup type from 'Automatic' to 'Automatic (Delayed Start)' and click 'Apply'.
- Turn off USB power saving. Open 'Device Manager' and expand 'Universal Serial Bus controllers'. Right-click 'USB Root Hub' and choose 'Properties'. On the 'Power Management' tab, clear the 'Allow the computer to turn off this device to save power' checkbox. If you have multiple USB root hubs, do this for all of them.
Everything prints twice
If everything comes out of the printer twice, PrintNode is probably running twice on the computer.
- Check that only one user is logged into PrintNode on the computer. If multiple users are logged in, PrintNode runs for each of them, so every job gets sent twice.
- Check that PrintNode isn't installed as a Windows Service. On the computer that drives the printers, go to http://localhost:8888 in your browser. If you see a page with the PrintNode version in the top right corner, PrintNode was installed as a service. Uninstall PrintNode and reinstall it without checking the box for the Windows Service.
Printing on the wrong printer
- Check which printer is connected to the packing station. You do this in the printer settings. If the printer has moved to a different computer, for example because a colleague relocated it, you'll need to select it again.
- Check the printer for each document type. For each packing station, you set the printer separately for 'Printer for shipping labels', 'Printer for packinglists' and 'Printer for product and location labels'. If your product labels come out of the wrong printer, the wrong printer is probably selected there. To learn how to set up and print product labels, see Printing product labels.
Labels come out blank
- Using a Zebra? Enable ZPL Support. ZPL is Zebra's own printer language, which Picqer uses to control the printer directly. Other brands don't have this setting. Go to the printer settings, click 'Edit' next to the correct printer and set 'ZPL Support' to 'Yes'.
- Calibrate the printer. During calibration, the Zebra measures how large your label is and where one label ends and the next begins. As long as that measurement is off, the printer doesn't know where to start printing and the label stays blank. For the steps, see Calibrating Zebra printer.
- Using a Mac? Set the dimensions in PrintNode. Open PrintNode, go to the 'Printers' tab and check that 'Page width' and 'Page height' are set, in inches.
- Change the Engine in PrintNode. Go to the 'Printers' tab and select a different 'Engine'.
Labels are skewed or run across two labels
Are your labels skewed, running across two labels, or do you see blank labels in between? Then the printer can no longer tell where one label ends and the next begins. Calibrate your printer so it learns this again. Using a Zebra? See Calibrating Zebra printer for the steps. Using another brand? Check its manual for the calibration steps.
If labels from one shipping provider print correctly and labels from another don't, your printer isn't the cause. The label was already generated incorrectly. Contact your shipping provider.
The size is wrong or the label prints rotated
Where you set the label size depends on your operating system.
Windows
You set the size on the printer itself. Open 'Control Panel', select 'Devices and printers', right-click the printer and choose 'Printing Preferences'. On Windows 11, type 'Printers' in the Windows search bar to reach the same settings. For shipping labels, use the settings below:
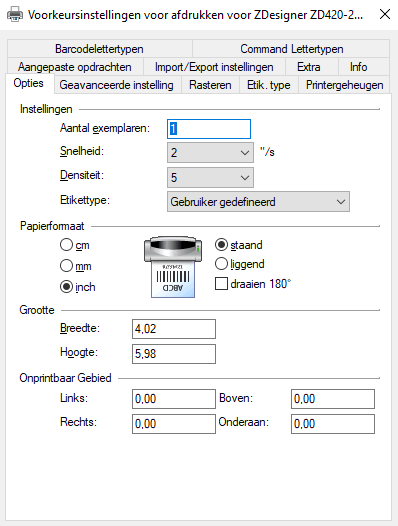
If the label prints rotated, set the paper format to landscape instead of portrait, or tick rotate 180°. If the label still comes out wrong, swap the width and the height as well.
Mac
You set the size in PrintNode. Open PrintNode from the round icon in the top bar next to your clock and go to the 'Printers' tab. For the printer you use for shipping labels, set 'Page width' to 4.02 inch and 'Page height' to 5.98 inch.
Printing on a Dymo and is the content rotated 90 degrees on the label? Then swap 'Page width' and 'Page height' in PrintNode.
Product labels have no fixed size: Picqer uses the size configured on the printer itself, as described above for Windows and Mac. Just make sure the label is at least 50 mm wide and 25 mm high, because the barcode and text won't both fit in less space.
Poor quality or the barcode won't scan
If labels are faint or smudged, or your scanner won't read the barcode, the printer is printing too fast or too light.
- Using a Zebra? Enable ZPL Support. Without ZPL, a Zebra prints the label as an image, which makes the barcode grainy. Other brands don't have this setting. Go to the printer settings, click 'Edit' next to the correct printer and set 'ZPL Support' to 'Yes'.
- Lower the speed and raise the density.
Windows: open 'Control Panel' and select 'View devices and printers'. Right-click the printer and choose 'Printing Preferences'. On Windows 11, type 'Printers' in the Windows search bar to reach the same settings. Set the speed to 2 and the density to 5.
Mac: you don't set this through macOS itself. Using a Zebra? You set the speed and density through CUPS: the print system built into macOS. Go to http://localhost:631/printers in your browser, click 'Set Default Options' next to the right printer, and adjust 'Darkness' and 'Print Rate' (also called 'Speed') there. Do you see a message that the web interface is disabled instead? Runcupsctl WebInterface=yesin Terminal and try again. Using another brand? Configure it through your printer manufacturer's own software. - Printing a product label? Check that the label is large enough. Under 50 mm wide and 25 mm high, the barcode gets too small to scan reliably.