

Calibrating Zebra printer
A Zebra printer sometimes loses track of how big your label is. Labels then come out half-printed, blank or skewed, or the printer feeds two at a time. Calibrating makes the printer measure again where each label starts and ends.
On this page
Calibrating from your computer (Windows)
On Windows, the quickest way to calibrate is from Zebra Setup Utilities. This runs the automatic calibration, which works for every Zebra model.
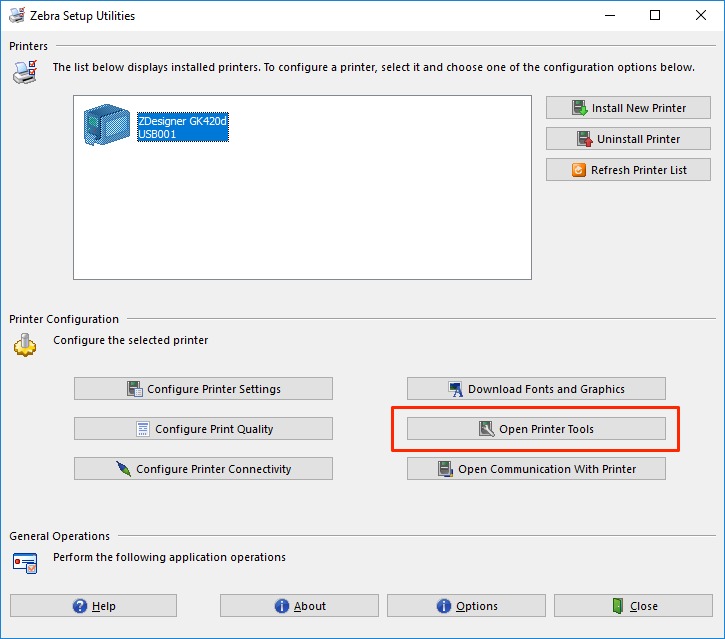
In Zebra Setup Utilities, select the Zebra printer you want to calibrate.
Click 'Open Printer Tools'.
Click the 'Action' tab.
Select 'Calibrate media'.
Click 'Send'.
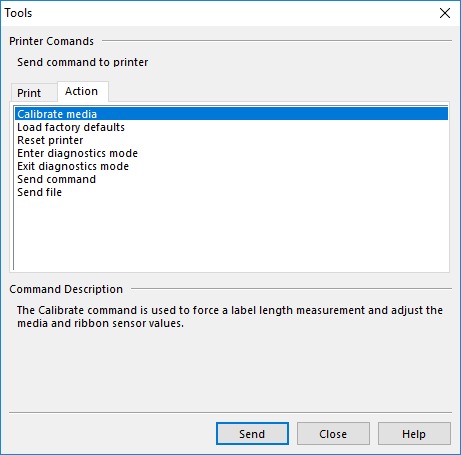
The printer now feeds 2 to 5 blank labels. After that, the printer is calibrated and you can close the window.
If that doesn't fix the problem, or if you use pre-printed labels, calibrate on the printer itself instead.
Calibrating on the printer itself
On a Mac, you always calibrate on the printer itself, because Zebra Setup Utilities is Windows-only.
Which buttons you press depends on the model. If your model isn't listed below, check your printer's manual.
ZD420d and ZD421d
Positioning the sensor
The ZD series has a sensor you can slide sideways. If it isn't in the right position, the printer can't see your labels. So check the sensor before you calibrate.
Turn the printer off.
Open the printer by pulling the latches on both sides towards you.
At the front of the printer, underneath the paper, you'll find a yellow sliding button with an arrow on it. That's the sensor. Make sure it sits in the middle, lined up with the icon you can see next to it.
Put the paper back and close the printer.
Calibrating
Make sure the labels are loaded properly and the printer is closed. Turn the printer on and wait for the status light to turn green.
Press and hold the pause button and the cancel button, on either side of the feed button, for 2 seconds, then release them.
The printer feeds a few labels through and adjusts the sensor.
Once the status light turns green again, the printer is calibrated. It now knows where the labels on the roll start and end, and prints them neatly in the middle again.
GX and GK series
With automatic calibration, the printer measures the labels itself. With manual calibration, it runs a more thorough measurement and readjusts the sensor along the way. Manual calibration is the next step if automatic calibration doesn't give a good result, or if your labels are pre-printed.
Automatic calibration
Make sure labels are loaded and the printer is closed. Turn the printer on and wait for the green light to come on.
Press and hold the feed button. The light flashes once, then twice. Release the button after the second flash, before the third sequence starts.
The printer feeds a few labels through and sets the media type and label length itself.
Once the printer stops, it's calibrated.
Manual calibration
Manual calibration switches off automatic calibration. To get it back, reset the printer to its factory settings by pressing the feed button and releasing it after the fourth flash.
Make sure labels are loaded and the printer is closed. Turn the printer on and wait for the green light to come on.
Press and hold the feed button. The light flashes once, then twice, then three times, and so on. Release the button after the seventh flash.
The printer adjusts the sensor and feeds the roll until a label sits under the printhead. It then prints a sensor profile.
Press the feed button once. One complete blank label comes out. The printer is now calibrated.
Are your labels still coming out wrong after calibrating? Work through the steps in troubleshooting printer issues.