Importing locations with Excel
In Picqer, you can easily create locations using the location wizard. You can also add or update multiple locations at once using the Excel import feature. Here’s how it works.
Adding or updating locations
To import or update locations, you’ll need an Excel file. Each column should have a title in the first row.
The “Name” field is required. All other columns are optional.
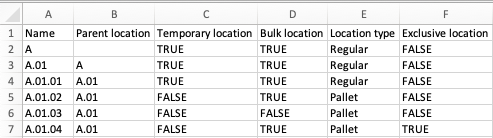
Name
Parent location
Temporary location (true/false)
By default, a product remains linked to a location until you manually unlink it. For a temporary location, the product is automatically unlinked when the stock at that location reaches 0.
If you want the product to always stay linked to the location, enter “FALSE”. If you want the location to unlink automatically when the stock reaches 0, enter “TRUE”.
Bulk location (true/false)
If a location is marked as a bulk location, its stock (depending on your general settings) will either never be used for picklists or only be used once all pick locations are empty. Read more about bulk locations and picklists.
If you want the location to be a pick location, enter “FALSE”. If you want to set it as a bulk location, enter “TRUE”.
Location type
Exclusive location (true/false)
If you want the location to be exclusive, enter “TRUE”. If you want to use the location for multiple products, enter “FALSE”.
Go to the locations page. Click the ‘Import/Export’ button and choose ‘Import locations’.
Upload your Excel file using ‘Kies bestand’. Then select the desired settings.

Autolink to parent
Then click “Go to step 2” to continue.
On this page, you’ll map the Excel columns to the corresponding fields in Picqer. You’ll see a preview of each column’s value on the right-hand side. If you select the option ‘None’, that column will be ignored.

When you’re done mapping, click ‘Go to preview’.
Picqer will then check each row in Excel to see which locations already exist and which fields have changed. This process may take a few minutes for large files.
Once the analysis is complete, you’ll see a preview of the actions Picqer will take. You can see which new locations will be added and which existing ones will be updated. Click ‘Show details’ to view the changes per location.
If something doesn’t look right, you can cancel the import by clicking ‘Cancel import’.
Everything correct? Click ‘Import locations’. The changes will now be applied in Picqer. This may take a few minutes. The import runs in the background, so you can continue working in Picqer while it completes.
Your locations have now been successfully imported and updated in Picqer.


